Windows shortcuts as an aid to the teacher

Windows keyboard shortcuts are a handy tool for users of digital content. Even simple keyboard shortcuts can be used in a variety of ways in the classroom. With just a few keystrokes on the keyboard, they can be used to perform tasks related to visualisation, comparison, information retrieval or communication.

In this chapter, we introduce a few easy shortcuts. We encourage you to find the situations where they are useful to you.

Windows keyboard shortcuts

Most computer users are familiar with at least some keyboard shortcuts and what they do. Shortcuts are actions that can be performed either by pressing individual keys on the keyboard or by pressing two or more keys at the same time. 

The Windows key ​( Win ) is located between the left Control ( Ctrl ) and Alternate Alt ) keys. Next to the Windows key, there may also be a function key, which can be used to access media functions (play/pause, volume control, etc.) or to adjust the brightness of the screen. The Shift key is located above the Ctrl key.

A photograph showing the left keys of a typical Windows QWERTY keyboard.
Common keyboard shortcuts for Windows

Shortcut

Function

Win

Open the Start menu

Win + D

Show the desktop. If you press again, the open windows will reappear.

Win + L

Lock Windows. (A handy command if you need to leave your computer for a while but don't want anyone to use it in the meantime.)

Win + E

Open Windows Explorer

Alt + Tab

Switch between open applications

F2

Rename the selected item

F5 tai Ctrl + R

Refresh the selected window

Ctrl + C

Copy

Ctrl + V

Paste

Ctrl + X

Cut

Ctrl + A

Select all of the contents of a document or window

Ctrl + Z

Undo previous action

Ctrl + Y

Redo the action

You can find more Windows shortcuts on Microsoft's Support pages.

Window management

The Windows and arrow keys make it easy to move windows around the screen. For example, you can place two browser windows next to each other or move a window to another screen. 

The use of side-by-side windows makes it easy to illustrate different stages of a phenomenon or compare different things. It's also handy for taking notes or doing tasks while viewing content.

Tip

The student can open the book in two windows, one showing the theory and the other showing the exercises. This makes it easy to complete the exercises while reading the chapter.

[embedded content beginning]
[embedded content end]

Placing windows side by side

  1. Drag and drop the tabs you want into their own windows.
  2. With one window selected, press Win + (arrow left) or Win +  (arrow right), depending on whether you want the window on the left or right side of the screen. Alternatively, you can drag the window to the desired side of the screen and it will stick there.
  3. When you release the Win key or the left mouse button, you can select the window that will be displayed on the other side of the screen.

Windows can also be moved around the screen using keyboard shortcuts. The desktop is divided into four sections. When a window is zoomed in to the left or right, the up and down arrow keys can be used to place the window in the top or bottom quadrant.

The window can be "freed" from the edge either by pressing Win + arrow in the opposite direction (if the window is on the right side, press arrow to the left) or by dragging the window from its title bar.

If you have two windows side-by-side, you can adjust the width of both windows at once by clicking and dragging the divider between them in the middle of the screen.

Moving a window to another screen

You can move a window to another screen with the keyboard command Win + Shift + / .

If the shortcuts to move windows do not work, check your computer settings.

Settings → System → Multi-tasking → Snap windows

A screenshot from Windows showing the Multi-tasking settings view.

Read more about moving windows on the Microsoft Support pages.

Keyboard shortcuts for moving windows

Shortcut

Function

Win +

Enlarge the window.

Win +

Remove the current application from the screen or minimise the desktop window.

Win +

Enlarge the application or desktop window to the left side of the screen.

Win +

Enlarge the application or desktop window to the right side of the screen.

Win + Shift + /

Move an application or window on your desktop from one screen to another.

Pasting without formatting

[embedded content beginning]
[embedded content end]

Most computer users probably know that text, images and files can be copied using the CtrlC keyboard shortcut. Likewise, most people know that the Ctrl + V keyboard shortcut pastes the copied content into a new location. 

If you want to paste text from a website into another document (for example in Google Docs) but don't want the text formatting to be carried over, you can add a Shift key to the combination.

The keyboard shortcut Ctrl + Shift + V therefore pastes the text without formatting.

A screenshot from Microsoft Word, showing different Copy and Paste options.

In Microsoft Word, the keyboard shortcut doesn't work, but you can right-click where you want to paste text and choose from the paste options provided. The "Keep text only" option pastes the text without formatting.

Emoji and symbol keyboard

[embedded content beginning]
[embedded content end]

The emoji keyboard can be made visible by pressing Win + . (dot). In the same menu you will also find various symbols.

A screenshot of the Windows Emoji keyboard.

Tip

Add an emoji to the assessment or comment you give the student. e-Oppi's digital books also allow you to comment on each answer separately in the comment box next to the returned answers. An appropriate emoji here and there will liven up the verbal assessment. 😊🤔🤭

Reading websites aloud

e-Oppi's digital books have a built-in read aloud functionality. Sometimes, you may want your device to read you the contents of another page or even a PDF file that you have opened in your browser. Microsoft's Edge browser makes it easy to do so on both desktop and mobile devices.

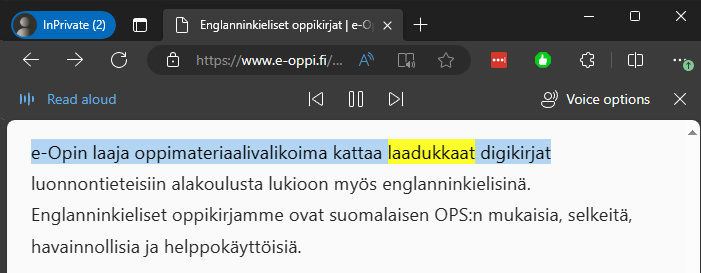
From the browser menu, select More tools Read aloud. The text-to-speech robot then begins reading the contents from the top of the page.

A view from Microsoft Edge, showing the read aloud tool.

If you want the text to be read from a specific point, move the mouse cursor to the desired point, right-click and select the "Read aloud" option.

You can also paint the desired text with the mouse, in which case only the painted text will be read aloud (right-click → Read aloud selection).

When the read aloud function is on, you can click anywhere on the screen and the browser will continue reading from where you clicked. To stop the audio, click the buttons at the top of the screen. You can also use the buttons to skip to the next or previous paragraph.

A screenshot from Microsoft Edge, showing the read aloud tool.

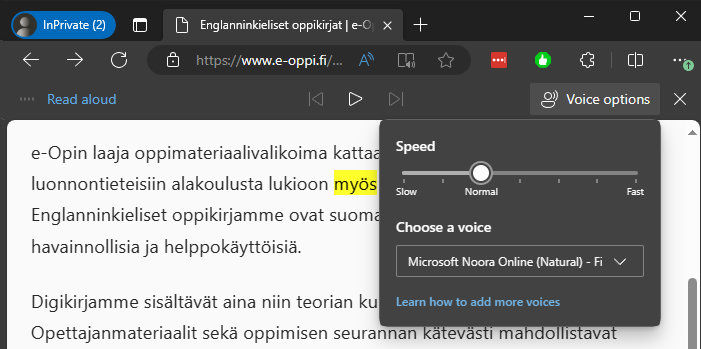
The sound menu allows you to set the speed at which the text is read. You can also choose which voice reads the text. There are many English voices to choose from, while the number of voices available in other languages may vary.

Tip

You can pause and resume the built-in read aloud function of e-Oppi's textbooks by pressing the space bar on the keyboard. The same works for Soundcloud audio clips in language books. The media playback can be paused by pressing the space bar This means that you can project the text onto the screen and pause the sound at the suitable point by using your keyboard.

Taking screenshots

Taking screenshots is a very versatile tool in a teacher's digital toolbox. They make it easy to add extra material to a lesson. Screenshots are also a great supplement to written notes. When made available to students, screenshots can be used for a wide range of activities.

The PrtScn button (Print Screen) takes a screenshot of the whole desktop. The screenshot is cached on your computer and you can paste the image into the application of your choice.

The Win + PrtScn keyboard shortcut saves a screenshot into your computer's Screenshots folder.

You can access the Screenshots folder directly by copying the link below into the address bar of Windows Explorer and pressing the Enter key:

%USERPROFILE%\Pictures\Screenshots

A view of the default screenshot folder in Windows.

If you want to take a screenshot of only part of the screen and possibly make edits or annotations to it, this is easily done with the Snip & Sketch tool.

Snip & Sketch (older version known as Snipping Tool)

[embedded content beginning]
[embedded content end]

With the Snip & Sketch tool, you can take screenshots of a part of the screen. The tool can be launched from the Start menu, but the Win + Shift + S keyboard shortcut will get you there faster. Pressing the shortcut brings up a menu at the top of the screen where you can select the screenshot option that suits your needs. The default option is a rectangular capture. Other options include free-form, window or full-screen capture.

A screenshot showing the options available on the snip & sketch tool in Windows.

Once the tool is active, you can drag the mouse with the left button down to take a screenshot of the desired part of the screen. The captured image is stored in the computer's cache. From there, you can paste the image into the desired location (such as a Word or Google Docs document). After taking a screenshot, a notification of the captured image will appear on the screen. Click the notification to edit and annotate the image, or simply save it as a file on your computer.

A screenshot showing the result of a screenshot on the snip & sketch tool in Windows.

Snip & Sketch lets you draw on an image with a variety of tools, including a highlighter pen. There are also a variety of rulers to help you draw straight lines and arcs. You can also crop the image.

Finally, you can save the image as a file or copy it to your computer's cache to paste it somewhere else (such as a Word or Google Docs document).

Read more about screenshot tools on the Microsoft Support page.

Zooming the browser window

[embedded content beginning]
[embedded content end]

You can zoom in or out on a webpage by holding the Ctrl key and pressing the + key.

Zooming out is done with the Ctrl and - (hyphen) keys.

To return to the default zoom level, press the Ctrl and 0 (zero) keys.

Zooming can also be done by rotating the mouse scroll wheel while holding down the Ctrl key. Zooming can also be done manually from the browser menu.

A screenhsot showing the zoom settings in Microsoft Edge.

When you zoom, a magnifying glass icon appears in the browser's address bar, with either - or + inside it, depending on how you've zoomed.

Note! In some browser applications, such as Google Docs, the Ctrl + + and Ctrl + - shortcuts do not work. Instead, the application uses its own commands to scale the text. If you want to zoom these applications, use the zoom function in the application's own menu.

YouTube and Vimeo

There's no need to rely on mouse clicks to rewind and pause videos. Players on the most popular video platforms (such as YouTube and Vimeo) can also be controlled using keyboard commands. For example, if you want to look at a phenomenon in detail, it's handy to go frame by frame. If you want to rewind a video, it's easier to tap a key on the keyboard a few times than to use the mouse to find the point you want to go back to.

YouTube keyboard shortcuts

Shortcut

Function

           (spacebar) , K

Play/pause

/

Go backwards/forwards in the video by 5 seconds

J

Go backwards 10 seconds in the player

L

Go forwards 10 seconds in the player

. (dot)

Go to next frame when the video is paused

, (comma)

Go to the previous frame when the video is paused

Home / End

Skip to the first/final seconds of the video

/

Increase/decrease volume by 5%

Numbers 19

Move between the 10% and 90% points in the video

Number 0

Go to the beginning of the video

F

Enter full screen mode. To exit full screen mode, press the F or Esc  key.

M

Mute the audio or turn the muted audio back on.

Source: YouTube Help

Vimeo keyboard shortcuts

Shortcut

Function

           (spacebar) , K

Play/pause

/

Go backwards/forwards by 5 seconds

J

Go backwards 5 seconds in the player

L

Go forwards 5 seconds in the player

Shift +

Go to next frame when the video is paused

Shift +

Go to the previous frame when the video is paused

/

Increase/decrease audio volume

F

Enter full screen mode. To exit full screen mode, press the F or Esc key.

M

Mute the audio or turn the muted audio back on